One-click Auth
Introduction
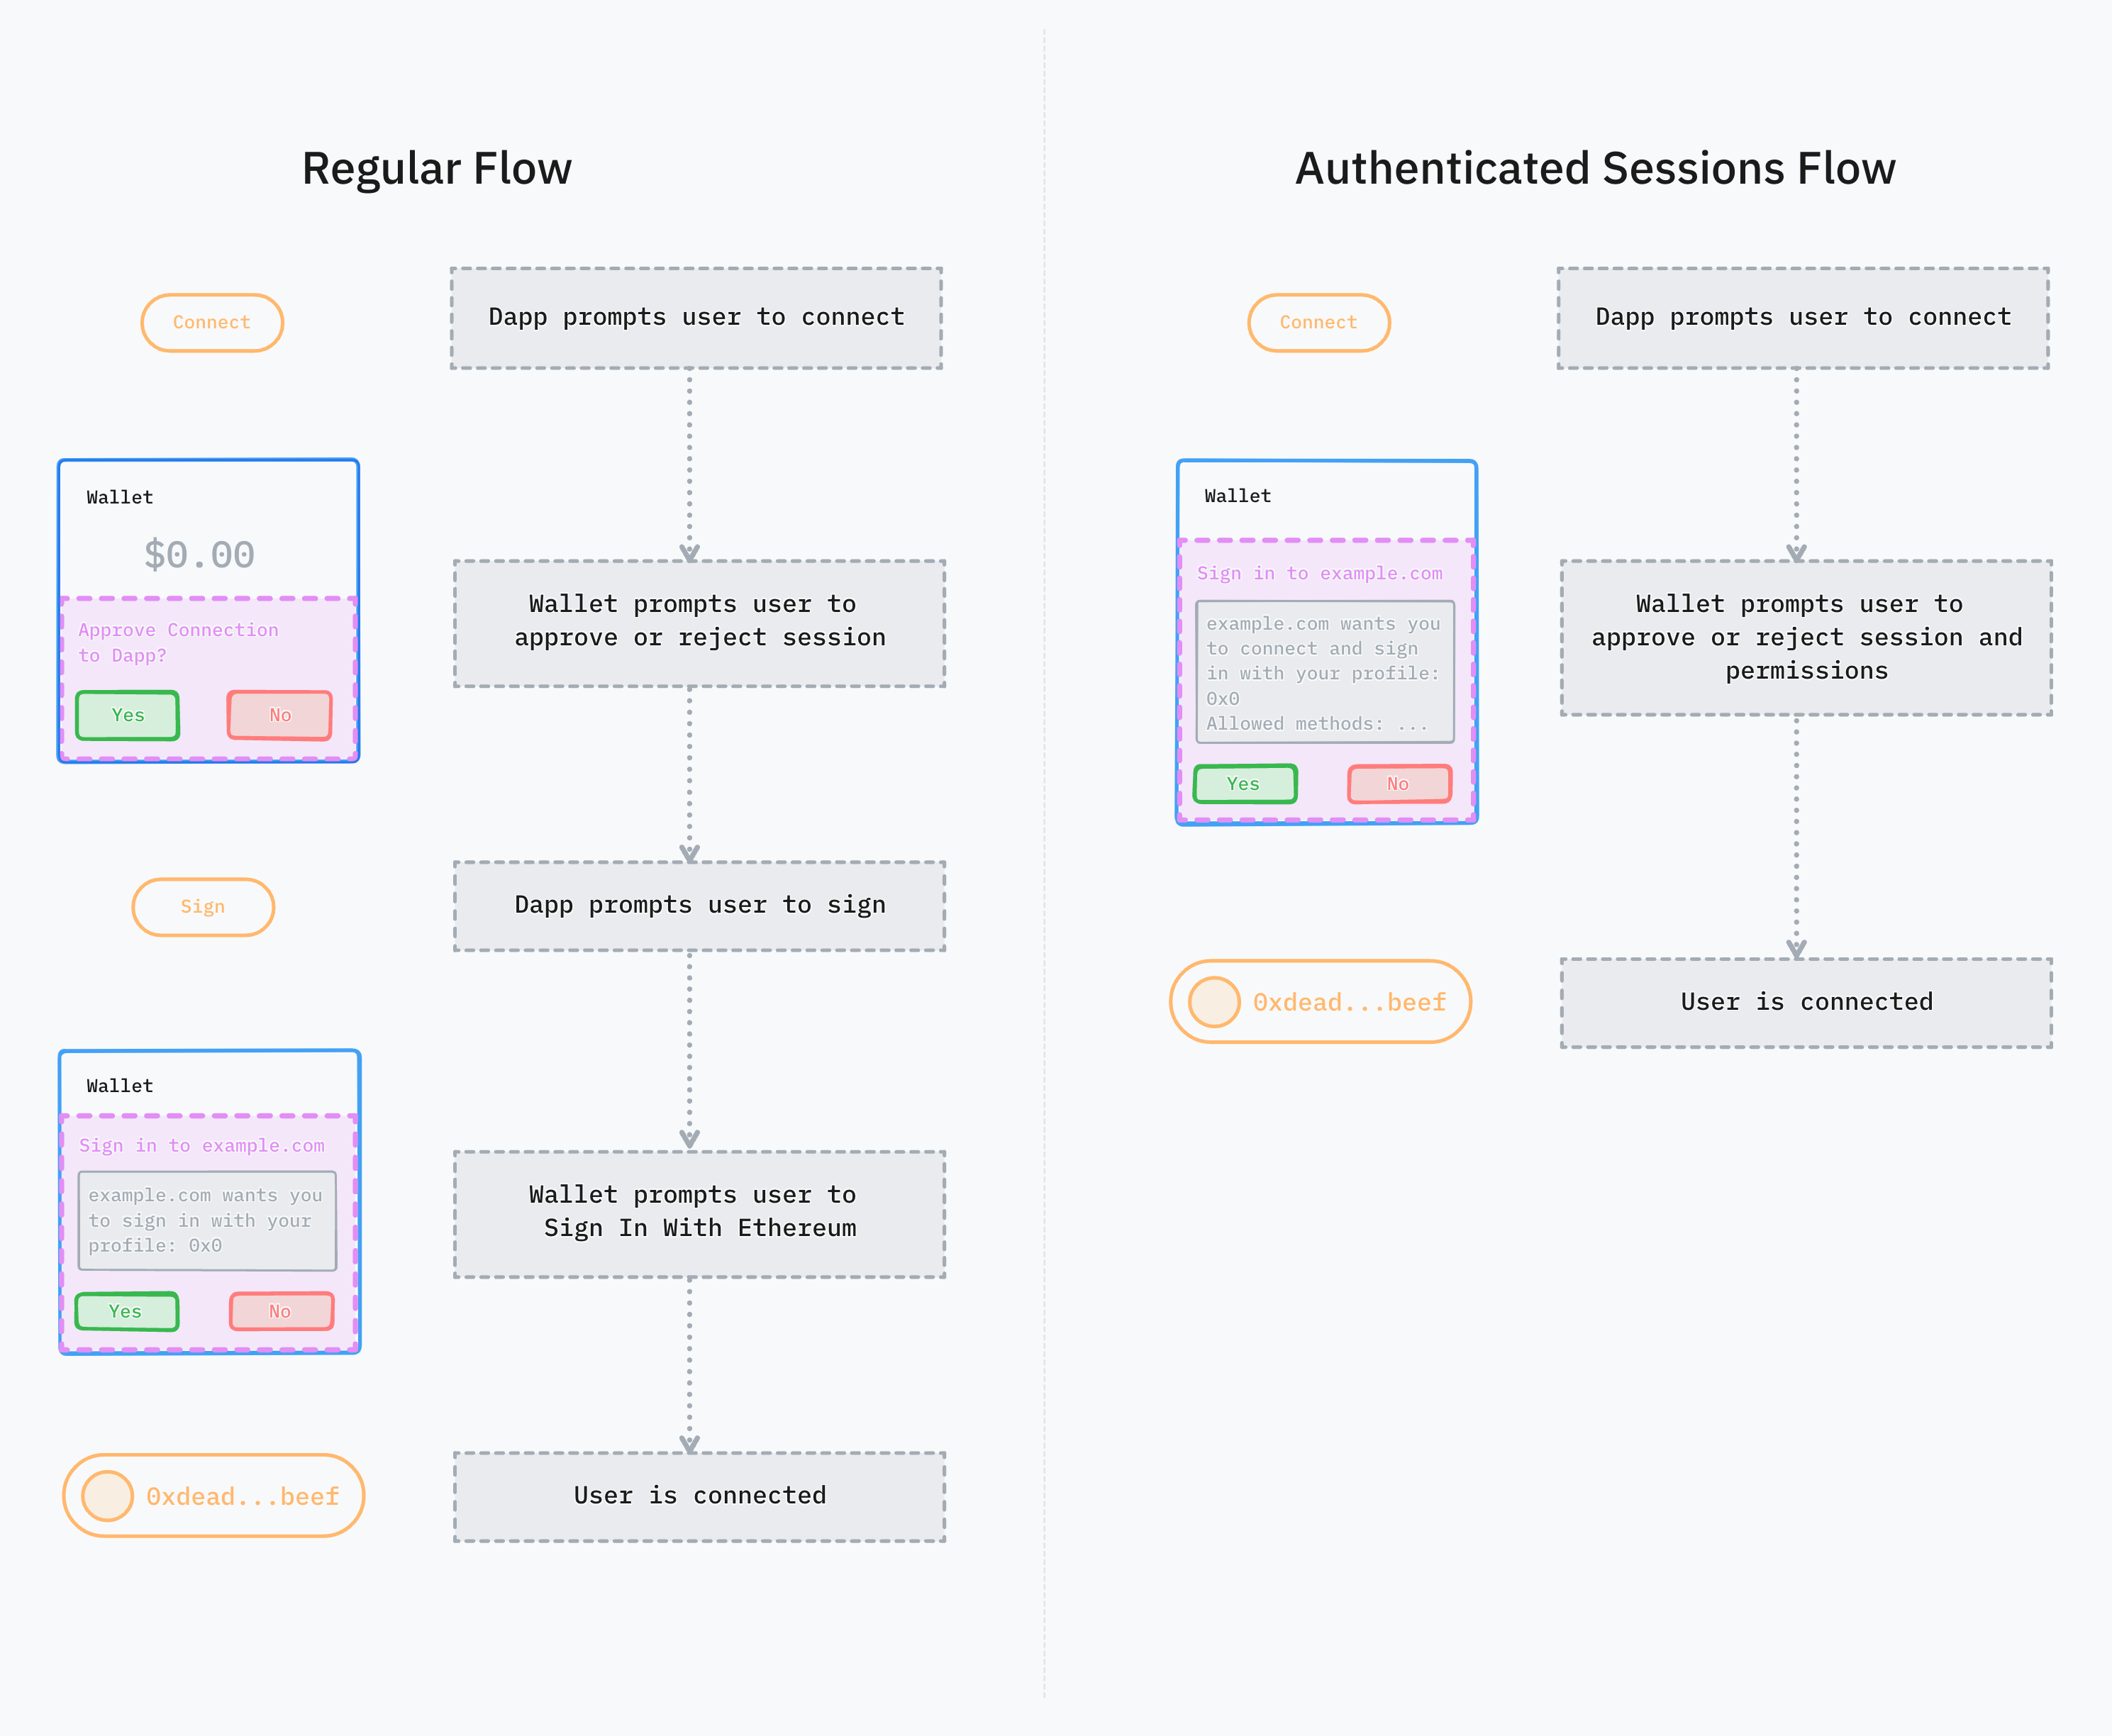
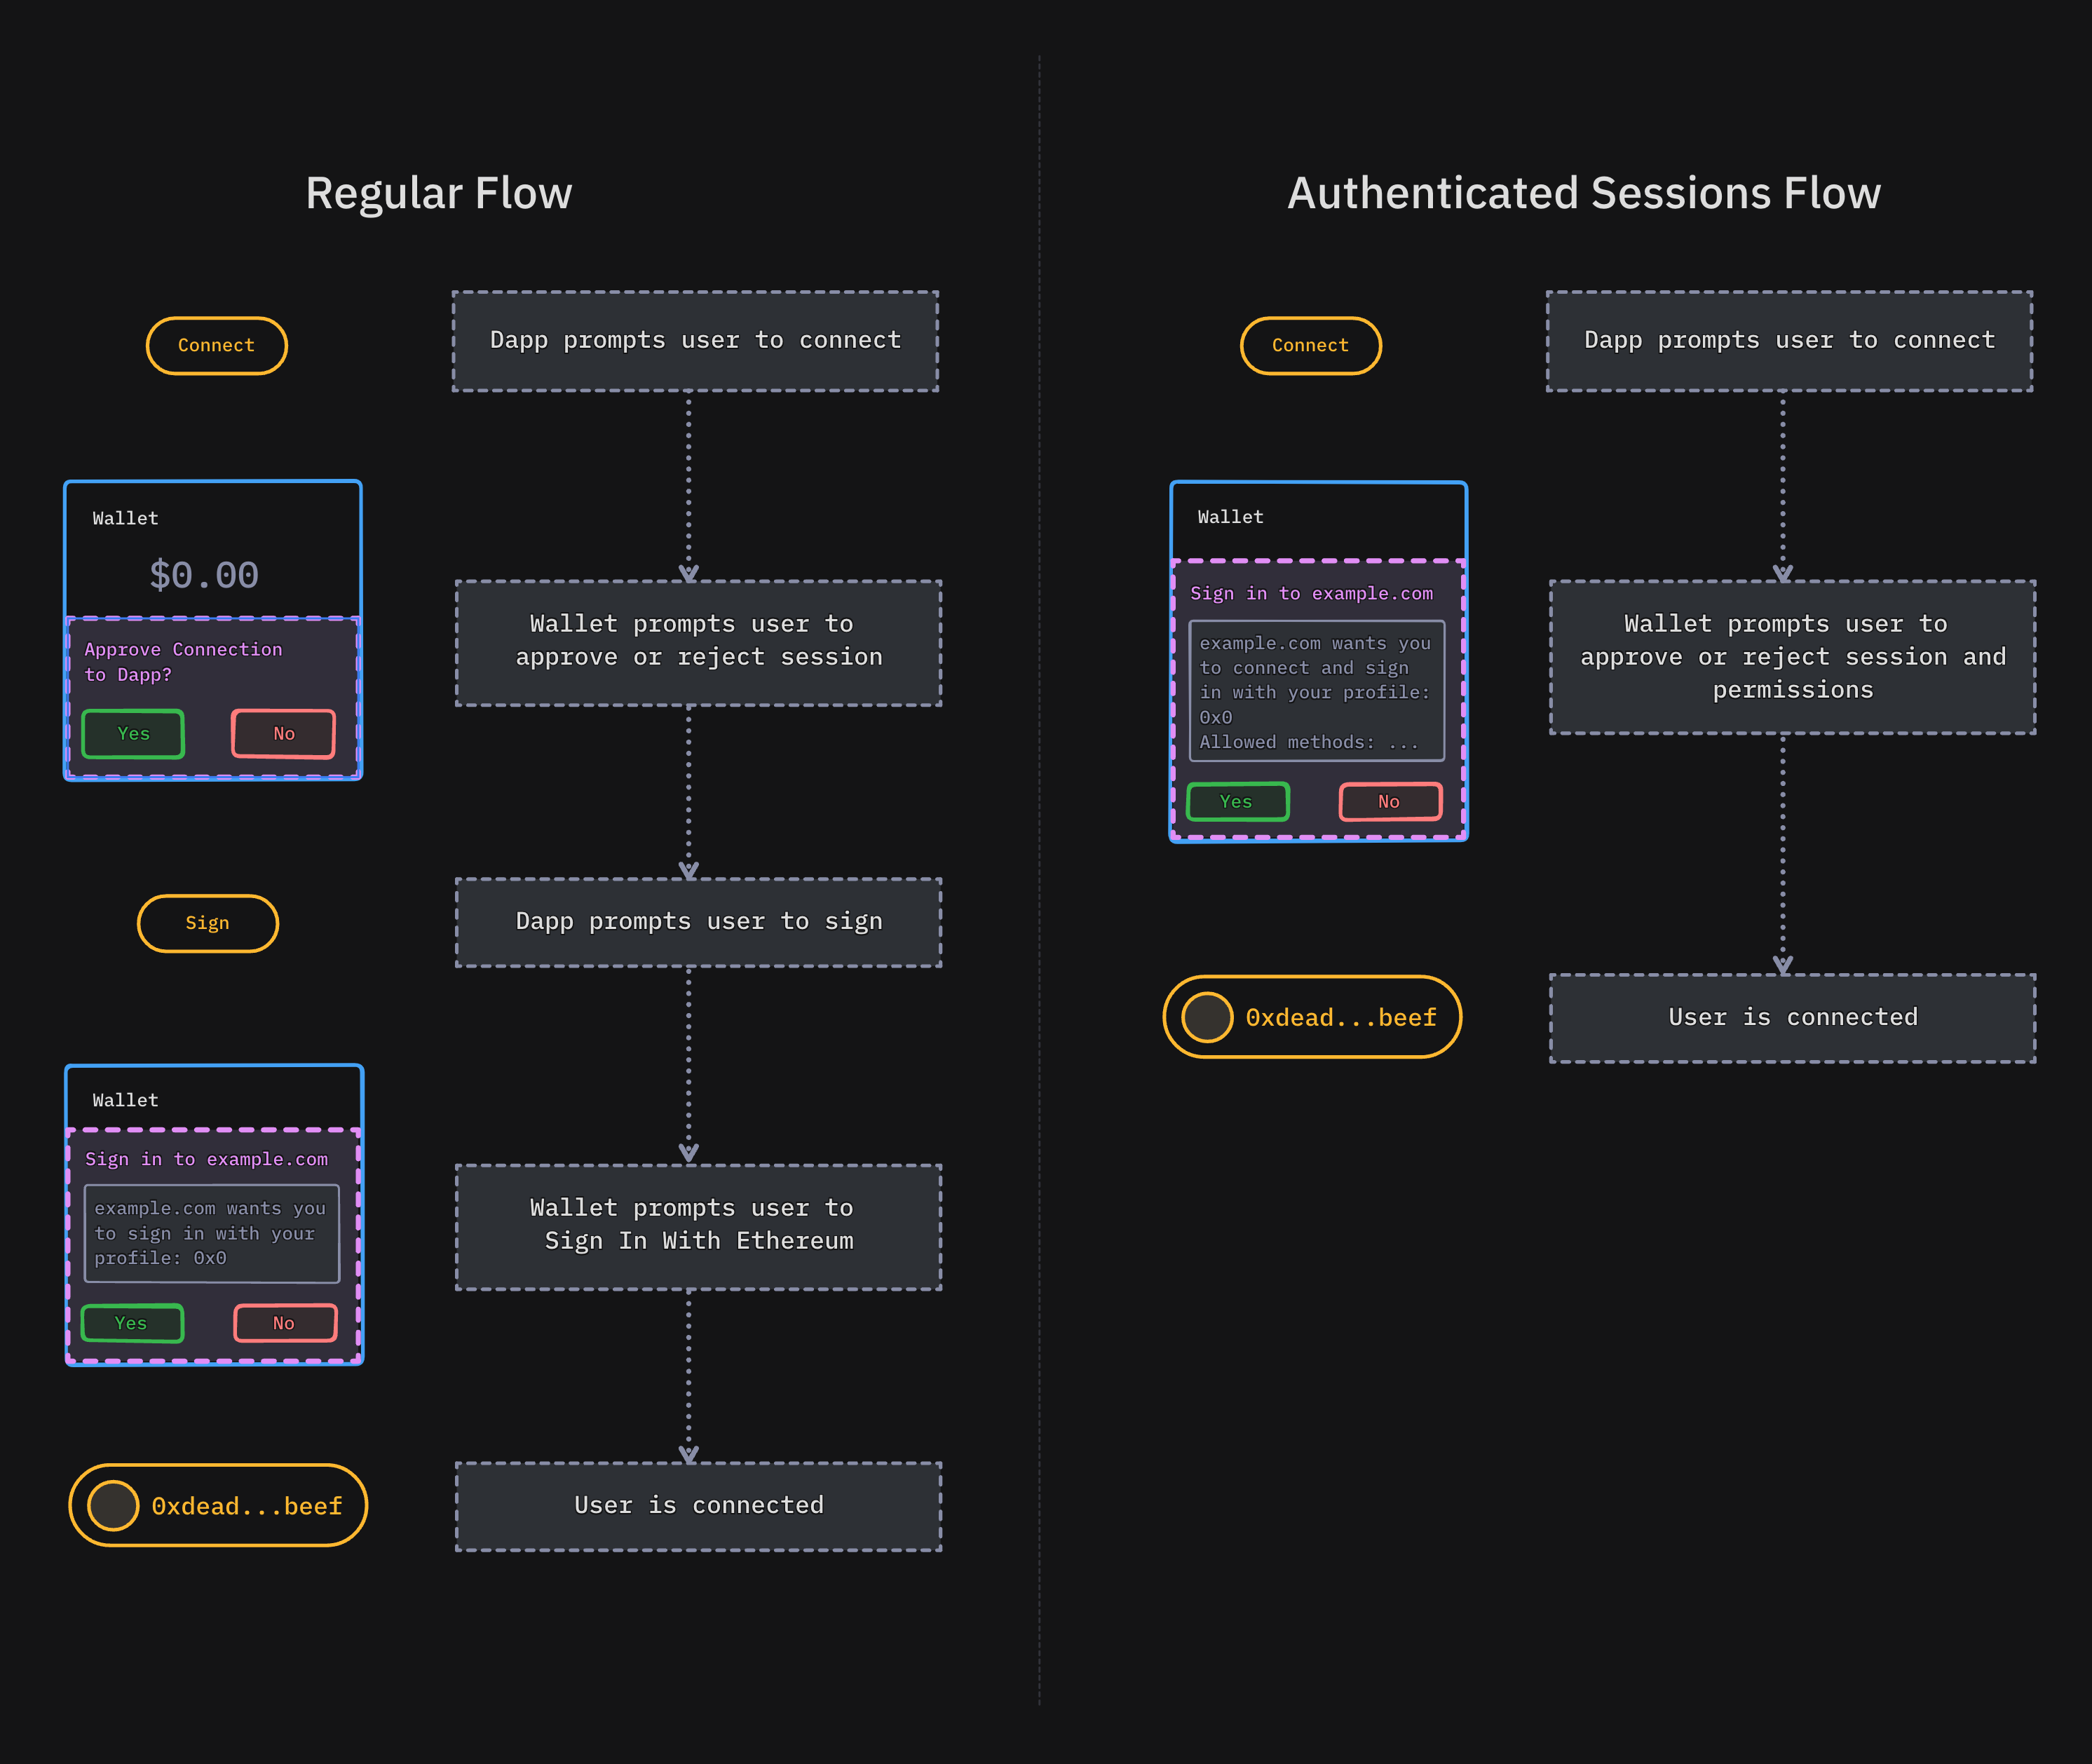
This section outlines an innovative protocol method that facilitates the initiation of a Sign session and the authentication of a wallet through a Sign-In with Ethereum (SIWE) message, enhanced by ReCaps (ReCap Capabilities).
This enhancement not only offers immediate authentication for dApps, paving the way for prompt user logins, but also integrates informed consent for authorization. Through this mechanism, dApps can request the delegation of specific capabilities to perform actions on behalf of the wallet user. These capabilities, encapsulated within SIWE messages as ReCap URIs, detail the scope of actions authorized by the user in an explicit and human-readable form.
By incorporating ReCaps, this method extends the utility of SIWE messages, allowing dApps to combine authentication with a nuanced authorization model. This model specifies the actions a dApp is authorized to execute on the user's behalf, enhancing security and user autonomy by providing clear consent for each delegated capability. As a result, dApps can utilize these consent-backed messages to perform predetermined actions, significantly enriching the interaction between dApps, wallets, and users within the Ethereum ecosystem.


Handling Authentication Requests
- Web
- iOS
- Android
- React Native
To handle incoming authentication requests, subscribe to the session_authenticate event. This will notify you of any authentication requests that need to be processed, allowing you to either approve or reject them based on your application logic.
web3wallet.on('session_authenticate', async payload => {
  // Process the authentication request here.
  // Steps include:
  // 1. Populate the authentication payload with the supported chains and methods
  // 2. Format the authentication message using the payload and the user's account
  // 3. Present the authentication message to the user
  // 4. Sign the authentication message(s) to create a verifiable authentication object(s)
  // 5. Approve the authentication request with the authentication object(s)
})
To handle incoming authentication requests, subscribe to the authenticateRequestPublisher. This will notify you of any authentication requests that need to be processed, allowing you to either approve or reject them based on your application logic.
Web3Wallet.instance.authenticateRequestPublisher
    .receive(on: DispatchQueue.main)
    .sink { result in
        // Process the authentication request here.
        // This involves displaying UI to the user.
    }
    .store(in: &subscriptions) // Assuming `subscriptions` is where you store your Combine subscriptions.
To handle incoming authentication requests, set up Web3Wallet.WalletDelegate. The onSessionAuthenticate callback will notify you of any authentication requests that need to be processed, allowing you to either approve or reject them based on your application logic.
override val onSessionAuthenticate: ((Wallet.Model.SessionAuthenticate, Wallet.Model.VerifyContext) -> Unit)
  get() = { sessionAuthenticate, verifyContext ->
      // Triggered when wallet receives the session authenticate sent by a Dapp
      // Process the authentication request here
      // This involves displaying UI to the user
}
To handle incoming authentication requests, subscribe to the session_authenticate event. This will notify you of any authentication requests that need to be processed, allowing you to either approve or reject them based on your application logic.
web3wallet.on('session_authenticate', async payload => {
  // Process the authentication request here.
  // Steps include:
  // 1. Populate the authentication payload with the supported chains and methods
  // 2. Format the authentication message using the payload and the user's account
  // 3. Present the authentication message to the user
  // 4. Sign the authentication message(s) to create a verifiable authentication object(s)
  // 5. Approve the authentication request with the authentication object(s)
})
Authentication Objects/Payloads
- Web
- iOS
- Android
- React Native
Populate Authentication Payload
import { populateAuthPayload } from "@walletconnect/utils";

// EVM chains that your wallet supports
const supportedChains = ["eip155:1", "eip155:2", 'eip155:137'];
// EVM methods that your wallet supports
const supportedMethods = ["personal_sign", "eth_sendTransaction", "eth_signTypedData"];
// Populate the authentication payload with the supported chains and methods
const authPayload = populateAuthPayload({
  authPayload: payload.params.authPayload,
  chains: supportedChains,
  methods: supportedMethods,
});
// Prepare the user's address in CAIP10(https://github.com/ChainAgnostic/CAIPs/blob/main/CAIPs/caip-10.md) format
const iss = `eip155:1:0x0Df6d2a56F90e8592B4FfEd587dB3D5F5ED9d6ef`;
// Now you can use the authPayload to format the authentication message
const message = web3wallet.formatAuthMessage({
  request: authPayload,
  iss
});

// Present the authentication message to the user
...
Building Authentication Objects
To interact with authentication requests, first build authentication objects (AuthObject). These objects are crucial for approving authentication requests. This involves:
- Creating an Authentication Payload - Generate an authentication payload that matches your application's supported chains and methods.
- Formatting Authentication Messages - Format the authentication message using the payload and the user's account.
- Signing the Authentication Message - Sign the formatted message to create a verifiable authentication object.
Example Implementation:
func buildAuthObjects(request: AuthenticationRequest, account: Account, privateKey: String) throws -> [AuthObject] {
    let requestedChains = Set(request.payload.chains.compactMap { Blockchain($0) })
    let supportedChains: Set<Blockchain> = [Blockchain("eip155:1")!, Blockchain("eip155:137")!, Blockchain("eip155:69")!]
    let commonChains = requestedChains.intersection(supportedChains)
    let supportedMethods = ["personal_sign", "eth_sendTransaction"]

    var authObjects = [AuthObject]()
    for chain in commonChains {
        let accountForChain = Account(blockchain: chain, address: account.address)!
        let supportedAuthPayload = try Web3Wallet.instance.buildAuthPayload(
            payload: request.payload,
            supportedEVMChains: Array(commonChains),
            supportedMethods: supportedMethods
        )
        let formattedMessage = try Web3Wallet.instance.formatAuthMessage(payload: supportedAuthPayload, account: accountForChain)
        let signature = // Assume `signMessage` is a function you've implemented to sign messages.
            signMessage(message: formattedMessage, privateKey: privateKey)

        let authObject = try Web3Wallet.instance.buildSignedAuthObject(
            authPayload: supportedAuthPayload,
            signature: signature,
            account: accountForChain
        )
        authObjects.append(authObject)
    }
    return authObjects
}
Responding to Authentication Requests
To interact with authentication requests, build authentication objects (Wallet.Model.Cacao). It involves the following steps:
- Creating an Authentication Payload Params - Generate an authentication payload params that matches your application's supported chains and methods.
- Formatting Authentication Messages - Format the authentication message using the payload and the user's account.
- Signing the Authentication Message - Sign the formatted message to create a verifiable authentication object.
Example:
ooverride val onSessionAuthenticate: ((Wallet.Model.SessionAuthenticate, Wallet.Model.VerifyContext) -> Unit)
  get() = { sessionAuthenticate, verifyContext ->
  val auths = mutableListOf<Wallet.Model.Cacao>()

  val authPayloadParams =
    Web3Wallet.generateAuthPayloadParams(
      sessionAuthenticate.payloadParams,
      supportedChains = listOf("eip155:1", "eip155:137", "eip155:56"), // Note: Only EVM chains are supported
      supportedMethods = listOf("personal_sign", "eth_signTypedData", "eth_sign")
  )

  authPayloadParams.chains.forEach { chain ->
    val issuer = "did:pkh:$chain:$address"
    val formattedMessage = Web3Wallet.formatAuthMessage(Sign.Params.FormatMessage(authPayloadParams, issuer))

    val signature = signMessage(message: formattedMessage, privateKey: privateKey) //Note: Assume `signMessage` is a function you've implemented to sign messages.
    val auth = Web3Wallet.generateAuthObject(authPayloadParams, issuer, signature)
    auths.add(auth)
  }
}
Populate Authentication Payload
import { populateAuthPayload } from "@walletconnect/utils";

// EVM chains that your wallet supports
const supportedChains = ["eip155:1", "eip155:2", 'eip155:137'];
// EVM methods that your wallet supports
const supportedMethods = ["personal_sign", "eth_sendTransaction", "eth_signTypedData"];
// Populate the authentication payload with the supported chains and methods
const authPayload = populateAuthPayload({
  authPayload: payload.params.authPayload,
  chains: supportedChains,
  methods: supportedMethods,
});
// Prepare the user's address in CAIP10(https://github.com/ChainAgnostic/CAIPs/blob/main/CAIPs/caip-10.md) format
const iss = `eip155:1:0x0Df6d2a56F90e8592B4FfEd587dB3D5F5ED9d6ef`;
// Now you can use the authPayload to format the authentication message
const message = web3wallet.formatAuthMessage({
  request: authPayload,
  iss
});

// Present the authentication message to the user
...
Approving Authentication Requests
- The recommended approach for secure authentication across multiple chains involves signing a SIWE (Sign-In with Ethereum) message for each chain and account. However, at a minimum, one SIWE message must be signed to establish a session. It is possible to create a session for multiple chains with just one issued authentication object.
- Sometimes a dapp may want to only authenticate the user without creating a session, not every approval will result with a new session.
- Web
- iOS
- Android
- React Native
// Approach 1
// Sign the authentication message(s) to create a verifiable authentication object(s)
const signature = await cryptoWallet.signMessage(message, privateKey)
// Build the authentication object(s)
const auth = buildAuthObject(
  authPayload,
  {
    t: 'eip191',
    s: signature
  },
  iss
)

// Approve
await web3wallet.approveSessionAuthenticate({
  id: payload.id,
  auths: [auth]
})

// Approach 2
// Note that you can also sign multiple messages for every requested chain/address pair
const auths = []
authPayload.chains.forEach(async chain => {
  const message = web3wallet.formatAuthMessage({
    request: authPayload,
    iss: `${chain}:${cryptoWallet.address}`
  })
  const signature = await cryptoWallet.signMessage(message)
  const auth = buildAuthObject(
    authPayload,
    {
      t: 'eip191', // signature type
      s: signature
    },
    `${chain}:${cryptoWallet.address}`
  )
  auths.push(auth)
})

// Approve
await web3wallet.approveSessionAuthenticate({
  id: payload.id,
  auths
})
To approve an authentication request, construct AuthObject instances for each supported blockchain, sign the authentication messages, build AuthObjects and call approveSessionAuthenticate with the request ID and the authentication objects.
let session = try await Web3Wallet.instance.approveSessionAuthenticate(requestId: requestId, auths: authObjects)
To approve an authentication request, construct Wallet.Model.Cacao instances for each supported chain, sign the authentication messages, generate AuthObjects and call approveSessionAuthenticate with the request ID and the authentication objects.
 val approveAuthenticate = Wallet.Params.ApproveSessionAuthenticate(id = sessionAuthenticate.id, auths = auths)
Web3Wallet.approveSessionAuthenticate(approveProposal,
  onSuccess = {
    //Redirect back to the dapp if redirect is set: sessionAuthenticate.participant.metadata?.redirect
  },
  onError = { error ->
      //Handle error
  }
)
// Approach 1
// Sign the authentication message(s) to create a verifiable authentication object(s)
const signature = await cryptoWallet.signMessage(message, privateKey)
// Build the authentication object(s)
const auth = buildAuthObject(
  authPayload,
  {
    t: 'eip191',
    s: signature
  },
  iss
)

// Approve
await web3wallet.approveSessionAuthenticate({
  id: payload.id,
  auths: [auth]
})

// Approach 2
// Note that you can also sign multiple messages for every requested chain/address pair
const auths = []
authPayload.chains.forEach(async chain => {
  const message = web3wallet.formatAuthMessage({
    request: authPayload,
    iss: `${chain}:${cryptoWallet.address}`
  })
  const signature = await cryptoWallet.signMessage(message)
  const auth = buildAuthObject(
    authPayload,
    {
      t: 'eip191', // signature type
      s: signature
    },
    `${chain}:${cryptoWallet.address}`
  )
  auths.push(auth)
})

// Approve
await web3wallet.approveSessionAuthenticate({
  id: payload.id,
  auths
})
Rejecting Authentication Requests
- Web
- iOS
- Android
- React Native
If the authentication request cannot be approved or if the user chooses to reject it, use the rejectSession method.
import { getSdkError } from '@walletconnect/utils'

await web3wallet.rejectSessionAuthenticate({
  id: payload.id,
  reason: getSdkError('USER_REJECTED') // or choose a different reason if applicable
})
If the authentication request cannot be approved or if the user chooses to reject it, use the rejectSession method.
try await Web3Wallet.instance.rejectSession(requestId: requestId)
If the authentication request cannot be approved or if the user chooses to reject it, use the rejectSessionAuthenticate method.
val rejectParams = Wallet.Params.rejectSessionAuthenticate(
    id = sessionAuthenticate.id,
    reason = "Reason"
)

Web3Wallet.rejectSessionAuthenticate(rejectParams,
  onSuccess = {
        //Success
  },
  onError = { error ->
      //Handle error
  }
)
If the authentication request cannot be approved or if the user chooses to reject it, use the rejectSession method.
import { getSdkError } from '@walletconnect/utils'

await web3wallet.rejectSessionAuthenticate({
  id: payload.id,
  reason: getSdkError('USER_REJECTED') // or choose a different reason if applicable
})
Testing One-click Auth
You can use Web3Modal Labs to test and verify that your wallet supports One-click Auth properly.
Was this helpful?